

Monday, April 29, 2013


Sunday, April 21, 2013
Doughnut

I made this teak trim ring, a.k.a., a doughnut, to finish out the entry of the pipe through the countertop. A couple of hours of carpentry in Raul's shop, and a little more time to sand and varnish. With this, I now have all of the pieces needed to finish the project!
Saturday, March 30, 2013
Swinging Pipe

Sunday, March 24, 2013
Annapolis Yacht Club

Wireless Display

Propane Stove Retrofit Progress

Above, you can see the PVC mock-up of the stainless steel pipe where the gas line will come through from the deck and go through the countertop.

Here is what 30 years of cooking and no cleaning looks like! This is the area behind the stove, which is very hard to get to.

After a little cleanup! It's hard to believe the builder put such beautiful wood behind a stove where it would never be seen.

The teak propane locker in it's place on deck.

The new stove, nice and shiny!
Sunday, February 10, 2013
Propane Locker Complete!


Monday, February 04, 2013
Adding the 5th Side!

Sunday, February 03, 2013
It's three-dimensional!


Monday, August 27, 2012

Saturday, August 25, 2012
Propane Locker Construction

Tuesday, August 14, 2012
Propane Locker
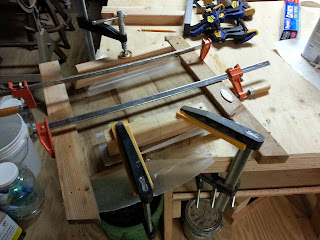
We have embarked on a project to switch our electric stove to propane. The first step is to build a locker on the deck, but we don't want one of the pre-fabbed fiberglass ones that you can buy. So, here is the beginning of a teak locker. We are working from rough lumber, and we have to build up the panels that will make the sides from 6" wide boards. Below, we are using biscuit joints to make the first panel. If you look closely, you can see one of the "biscuits" lying near the clamp.


Saturday, June 16, 2012
Replacing the Old Head
We decided to replace the 29 year old head, but after removing it found the green patina left over from the bronze base after it mixed with salt water. The new head also came with different mounting holes, so something had to be done to prepare the pedestal. We decided to make a shim from Azek, a vinyl building material that can be worked just like wood, but it never rots. Many thanks go out to Raul for the use of his woodshop to make the strange shape needed.
.JPG)
.JPG)
.JPG)
.JPG)
Sunday, May 06, 2012
.JPG)
.JPG)
Sunday, February 12, 2012
It's Blowing!
We have NW winds at about 30 knots today. The water is 3 feet below normal low water, due to the wind blowing the water out of the Bay...
Sunday, February 05, 2012
Fiddles

 My current project is to add some fiddles to our cockpit table. The main reason is that by putting fiddles at the hinge joint, the leaves will have better support when the table is open. There is one set of fiddles on the outside of the leaves (which are seen here), and another set on the under side of the main part of the table. When the leaves are opened, the fiddles will rest against each other to give a larger supporting surface to the open leaves. And as a bonus, our stuff won't fall off the table when we heel. Thanks to Raul for letting me use his woodshop to make the fiddles and get them epoxied on.
Sunday, December 25, 2011
Compass Complete
 For Christmas Eve, I reinstalled the compass. Christopher Columbus would have killed for a compass this nice!
Sunday, December 18, 2011
Compass Refill

 Refilling the compass isn't too hard: position it so that the plug is at the top, unscrew the plug, and then use a syringe to push the compass fluid in. I used fluid that I bought from Ritchie. It's mineral oil, which you could buy anywhere, but to be sure you get the right viscosity it's easiest to go to the maker. (I once tried mineral oil from the drugstore, but it was so thick it would take the compass a few hours to find North!) The hardest thing is to get all of the air out, and you can see that I still have a small bubble here. I will let the compass sit for a week, to let any additional bubbles accumulate at the top, and then I'll try to push some more fluid in.
Sunday, December 11, 2011
Another Project
 I rebuilt our compass about 5 years ago, replacing a cracked dome, but it still has a slow leak. Fortunately, I still have plenty of compass fluid (mineral oil) left over from my earlier repair. Here you see the compass exposed with the binacle cover removed. I've taken the compass off the boat so that I can work on it over the winter. If you look closely, you can see an earlier project, where I replaced an incandescent compass light with two LEDs.
Monday, December 05, 2011
Boom
With some help from my friends Raul and Tom, we were able to re-attach the boom to the gooseneck on Saturday, so this project is now complete. Next up, a tune-up for our cockpit table. More details later...
Sunday, November 20, 2011
Electric Furler!


 We now have electric roller furling! The gooseneck installation and electrical hookup went easily, and everything works great. Can't wait to use it next season!
Saturday, November 19, 2011
New Motor Installation

 In the top photo, there are now 4 weep holes that have been drilled through the end casing. All of the brushes are in this part of the motor, and with the springs loaded, it's a bit of a trick to hold the brushes down while attaching it to the body of the motor. The piece of cardboard allows me to hold all of the 4 brushes in position while I attach the end casing to the body. Once I have it in position, I simply slide out the cardboard while holding the casing in place until I can get the bolts engaged. The second picture shows the mounting plate exchanged with the temporary plastic end piece, and one of the attachment bolts. Note the grease around the drive shaft, and on the attachment bolt, to prevent seizing. If you look closely, you can also see the silicone sealant around the motor case bolts, an attempt to keep water out of the motor.
Friday, November 18, 2011
Furling Motor Parts


 Above is the new furling motor, and a spare brush set. The end plate at the top has been removed from the old motor, and replaces the plastic cover on the new motor during assembly.
Wednesday, November 16, 2011
New Hardware
I received the new replacement furling motor today. I plan to mate it with the gearbox this week, after implementing the suggestions for managing the water incursion problem, below.
Monday, November 14, 2011
Furling Motor Fixes


In the picture above (top), notice that the long case bolts are eroded near the end. This is the part of the bolt that was exposed to water. These bolts are nearly at the failure point.
I have received two recommendations with regard to the moisture
problem in the furling motor: use silicone to seal the recessed area
around the head of the two case bolts (the long bolts that hold the motor
together), and drill weep holes at the bottom of the motor (in the end
plate that holds the brushes) to allow any water to drip out.
I ordered a new motor today from Eric Pearson, the source of parts for these old Hood systems.
Saturday, November 12, 2011
In Mast Furling Motor Repair
 Here's the problem, water has seeped into the motor, and accumulated in the bottom of the unit, where all of the important electrical bits are, of course.
 Here is the gooseneck unit, with motor and gear box removed from the mast.
Thursday, November 10, 2011
Autopilot Voltage Follow-up (4)
 But here is the curiosity. This is the noise that exists on the voltage supply with the engine off and the autopilot off. What is the cause of the noise? Not sure, but it's going to be fun to find out. Who cares? Nobody but me...
Autopilot Voltage Follow-up (3)

Here is a closer look at the behavior with the autopilot on with the engine on.
Autopilot Voltage Follow-up (2)
 Here we zoom in a bit to see the detail of engine on, autopilot on, autopilot off, then autopilot on. The voltage drops down to as little as 11.5 volts as the autopilot hydraulic pump is engaged for steering.
Autopilot Voltage Follow-up
 Some of you may recall that I ran some tests this summer to collect voltage data on Silence's autopilot. I finally got around to plotting the data this week, and there are some interesting results. This all began because I suspected that I had a power problem because the autopilot would randomly shut down and reset itself, and drop off course. It turns out that the problem was caused by a loose connector on the back of the control unit, but I didn't figure that out until after I had built a data logger and collected this data. In the diagram above you will see that we start out with the engine off and the autopilot in standby. Shortly afterward, the engine is turned on and you can see the voltage rise as the alternator charges the batteries. (The straight line represents a period for which there is no data as I stopped logging to save space on the SD card.) Next, with the engine on, I started the autopilot and you see the noise on the signal increase. Later, the same cycle is repeated, engine off, engine on, autopilot on, autopilot off, and then at the end, engine off, and power turned off.
Sunday, November 06, 2011
Downrigging 2
We completed winterizing today, running antifreeze through all of the systems. We took down the mainsail as well. Time for Silence to take a long winter's nap.
Monday, October 31, 2011
Downrigging
We took down the headsail this weekend, and brought our dinghy home for the winter. Next weekend we will get the mainsail flaked away, and begin pushing anti-freeze through all of the freshwater systems.
Tuesday, October 25, 2011
End of the Season
We had our last sail of the season last weekend, and it was a beauty.
15+ knots of breeze and warm, with our friends Eveleen and Eric
onboard. Now we begin the process of putting the boat away for the
winter.
15+ knots of breeze and warm, with our friends Eveleen and Eric
onboard. Now we begin the process of putting the boat away for the
winter.
Subscribe to:
Posts (Atom)