It was nice to wakeup to this day.
Tuesday, May 28, 2013
Wednesday, May 22, 2013
Wednesday, May 15, 2013
New Batteries
With some help from Raul, I replaced our two house batteries yesterday. Man, these things are heavy.
Saturday, May 11, 2013
Haulout Complete
At the top, you can see the guys have lifted the boat to paint the centerboard. I took the opportunity to mark the lift cable so that I can tell where the board is when we sail.
Silence is back in her slip, and the stove installation was completed this week. Most projects are done, and the deck is scrubbed, so now it's time to sail!
Monday, April 29, 2013
Sunday, April 21, 2013
Doughnut
I made this teak trim ring, a.k.a., a doughnut, to finish out the entry of the pipe through the countertop. A couple of hours of carpentry in Raul's shop, and a little more time to sand and varnish. With this, I now have all of the pieces needed to finish the project!
Saturday, March 30, 2013
Swinging Pipe
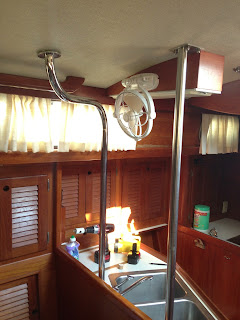
Kato Marine fabricated this curvy 1-1/4" stainless pipe to connect between the deck and the galley cabinet. The propane fuel line and the solenoid wiring will run through the pipe. This picture shows the "dry fit", to find the correct orientation for the backing plate at the top. The plate will be welded to the tube and then we can install. The other pipe is the path for the centerboard cable, from the deck through the water line.
Sunday, March 24, 2013
Annapolis Yacht Club
This is AYC at sunset. Storm clouds were passing through the area... I took this with my iPhone and processed it with Pixlromatic.
Wireless Display
This is an Arduino WiFi shield. I'm planning to build a bridge from my instrument bus, set up a web service for the NMEA data, and display it on my iPhone. This will be very cool if I can make it work.
Propane Stove Retrofit Progress
Above, you can see the PVC mock-up of the stainless steel pipe where the gas line will come through from the deck and go through the countertop.
Here is what 30 years of cooking and no cleaning looks like! This is the area behind the stove, which is very hard to get to.
After a little cleanup! It's hard to believe the builder put such beautiful wood behind a stove where it would never be seen.
The teak propane locker in it's place on deck.
The new stove, nice and shiny!
Sunday, February 10, 2013
Propane Locker Complete!
The construction of the propane locker is complete. Over the weekend we trimmed the lid and rounded the corners with a router and then did final sanding down to 320 grit. The first coat of Armada has been applied in the bottom picture, bringing out the grain of the teak. More coats to come!
Monday, February 04, 2013
Adding the 5th Side!
The lid is built, now we are glueing it on with epoxy. The whole box will be attached to the deck with two draw latches, so that it can be removed for access to the propane tank, and I can take the whole box home for varnishing each winter...
Sunday, February 03, 2013
It's three-dimensional!
It's taken a long while, but two weeks ago we finished the sides of the Propane Locker. Check out the joint that we used to get a nice clean corner on the box. This profile was produced with a specialized router bit. It took a bit of work to understand how to adjust the height and depth, but the results are worth all the work. Since these pictures were taken, we have constructed the panels for the top of the box, and begun crafting the wood parts that will go inside to support the propane tank.
Subscribe to:
Comments (Atom)


